The Nintendo Switch offers a versatile gaming experience, allowing players to enjoy their favorite titles both on-the-go and on a larger screen.
When connecting your Switch to a TV, you might find that adjusting the resolution can enhance your gaming experience, whether you’re aiming for crisper graphics or smoother performance.
Here’s a comprehensive guide on how to change the TV resolution on your Nintendo Switch.
Read: How To Update Nintendo Switch Firmware
Change TV Resolution On Nintendo Switch
First, ensure your Nintendo Switch is properly connected to your TV via the dock. Turn on your console and navigate to the Home screen. From there, select the gear icon at the bottom of the screen to open the System Settings.
Once you’re in the System Settings menu, scroll down on the left-hand side until you find the TV Settings option. Select it to access the TV-related options.
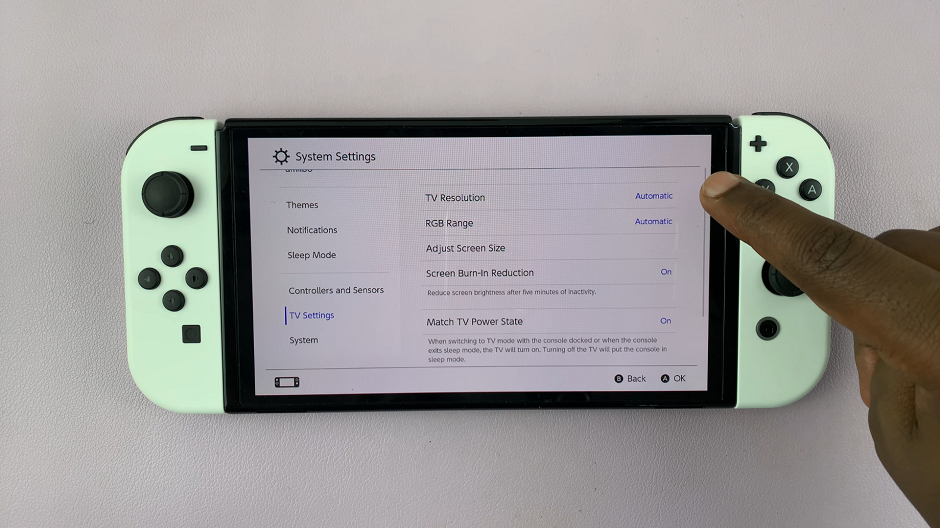
Within the TV Settings menu, you’ll see an option labeled TV Resolution. Click on this option to open a list of available resolutions.
The Nintendo Switch typically offers two resolution options:
480p: Standard definition, suitable for older TVs or if you experience performance issues.
Automatic: Adapts to the quality that is currently set on your TV.
Select the resolution that best suits your TV and gaming preferences. The console will apply the new settings immediately. A factor that may influence your decision is if the frame rate is affected.

After selecting your desired resolution, your TV might take a moment to adjust. Make sure the picture is clear and correctly fits the screen. If the resolution looks good, you’re all set! If not, you can always return to the TV Resolution menu and try a different setting.
Tips for Optimizing Your Gaming Experience
Match the Resolution to Your TV’s Capability: Ensure your TV can handle the resolution you select. Older TVs may not support 1080p, and setting it too high could result in no signal or poor image quality
Consider Performance vs. Quality: Higher resolutions offer better image quality but may impact performance in some games. If you experience lag or frame rate drops, try lowering the resolution to 720p.
Adjust Other TV Settings: Some TVs have additional settings for gaming, such as Game Mode, which can reduce input lag and improve your gaming experience.
Check Your HDMI Cable: Ensure you’re using a high-quality HDMI cable, as this can affect the signal and image quality.
Troubleshooting Common Issues
No Signal: If your TV displays a “No Signal” message after changing the resolution, wait a few seconds. If it persists, try switching to a lower resolution.
Poor Image Quality: If the image appears blurry or distorted, double-check that the selected resolution matches your TV’s native resolution.
Lag or Performance Issues: If you notice performance issues, consider lowering the resolution or enabling Game Mode on your TV.
Changing the TV resolution on your Nintendo Switch is a straightforward process that can significantly enhance your gaming experience. Whether you’re aiming for the best visual quality or optimal performance, adjusting the resolution ensures you get the most out of your console and TV setup.