In today’s fast-paced digital world, a stable and reliable internet connection is crucial for both work and leisure activities. While Wi-Fi has become increasingly popular, Ethernet connections still offer unparalleled speed and reliability, especially for tasks that demand high bandwidth.
However, setting up an Ethernet connection on a Windows computer might seem daunting for some users. If you find yourself in this situation, fear not – this comprehensive guide will walk you through the process step by step.
Ethernet is a wired networking technology that allows devices to connect to a local area network (LAN) or the internet through an Ethernet cable. Compared to Wi-Fi, Ethernet typically offers faster speeds, lower latency, and more stable connections, making it ideal for tasks such as online gaming, video streaming, and large file transfers.
Check Your Hardware
Before you begin configuring your Windows computer for Ethernet connectivity, it’s essential to ensure that your hardware is set up correctly. Here’s what you need to do:
Check the Ethernet Cable: Make sure that the Ethernet cable is securely plugged into both your computer’s Ethernet port and the router or modem.
Inspect the Ethernet Port: Ensure that the Ethernet port on your computer is not damaged or obstructed. If there are any visible signs of damage, consider using a different Ethernet port or seeking professional assistance.
Watch: Samsung Galaxy A35 5G: How To Restore Deleted Files
Enable Ethernet On Windows Computer (Cable Plugged In)
If your Ethernet cable is connected, but you still have no internet, it is likely that the Ethernet option has been disabled.

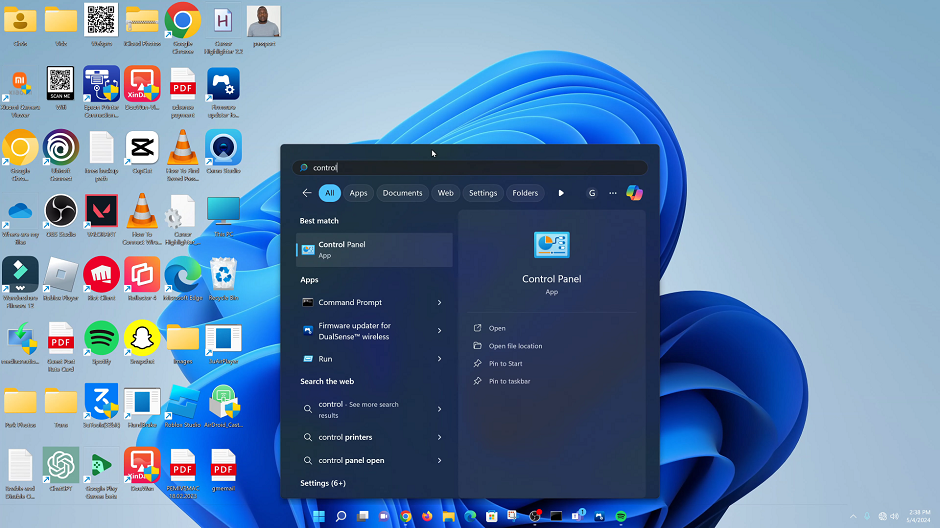
To enable ethernet, simply go to the Start menu and type in Control Panel in the search bar. Click on the Control Panel option to open it.
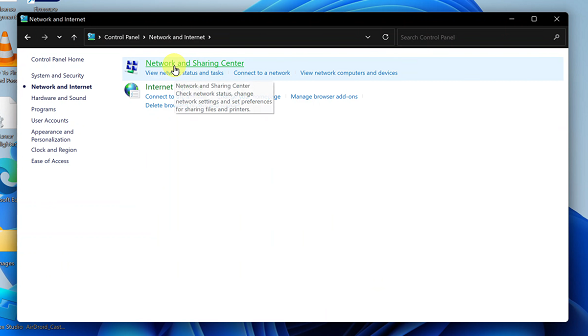
In the Control Panel dialog box, click on Network and Internet, then on Network and Sharing Center option.
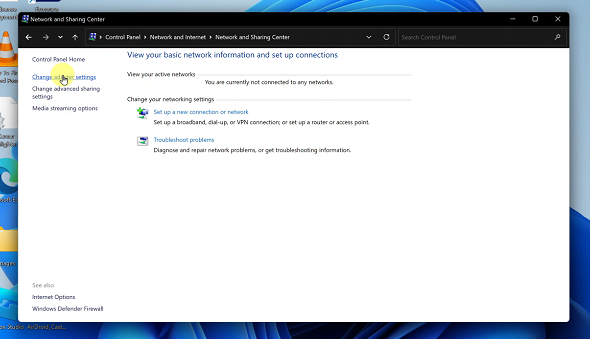
On the left-hand side of the Network and Sharing Center page, click on Change Adapter Settings.
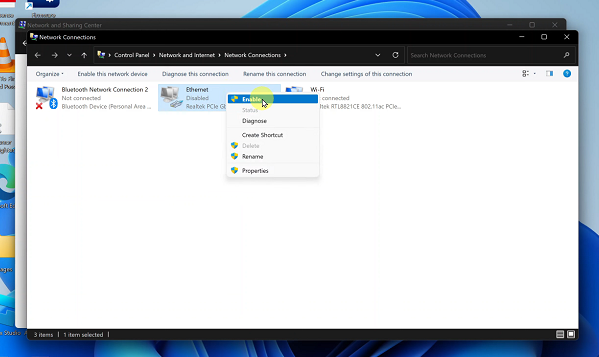
Here, you should see the Bluetooth, Ethernet and Wi-Fi options. The Ethernet option should be greyed out, because it has been disabled.
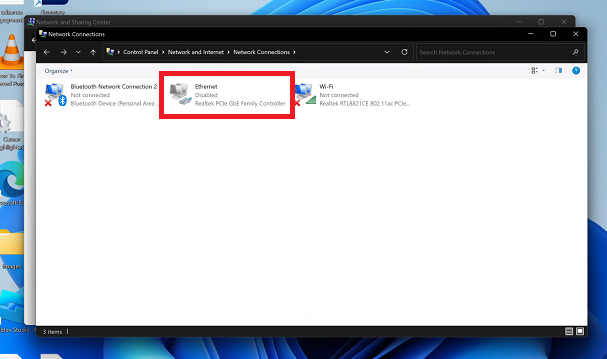
Finally, click on the Ethernet option once to select it, then right-click to reveal its menu options. Select Enable by clicking on it. This should restore your Ethernet connection.
Troubleshooting Ethernet Connection Issues
If you encounter any difficulties while enabling the Ethernet connection, here are some troubleshooting steps you can try:
Restart Your Computer: Sometimes, a simple restart can resolve network connectivity issues.
Check Cable Connections: Ensure that the Ethernet cable is securely plugged in at both ends and that the cable itself is not damaged.
Update Network Drivers: Outdated or incompatible network drivers can cause connectivity problems. Check for updates to your network adapter drivers and install them if necessary.
Reset Network Settings: If all else fails, you can try resetting your network settings to their default configuration. To do this, open the Command Prompt as an administrator and run the following commands:
netsh winsock reset
netsh int ip reset
ipconfig /release
ipconfig /renew
Read: How To Set Side Key Double Press To Open Favorite App On Samsung Galaxy A55 5G