Capturing an entire webpage, a lengthy email, or a long document in one seamless screenshot is an essential skill for maximizing productivity on your M4 iPad Pro. Whether you’re a student compiling research, a professional documenting processes, or simply someone who wants to share extensive content without breaking it into multiple images, the ability to take scrolling screenshots can be incredibly useful.
In this guide, we will walk you through the detailed steps to master this feature, ensuring you can effortlessly capture and share extended content with precision and ease. By the end of this article, you will have a thorough understanding of how to take, edit, and save scrolling screenshots, transforming how you handle long-form content on your iPad.
Let’s dive into the step-by-step process that will enable you to take scrolling screenshots on your M4 iPad Pro efficiently.
Watch: How To Screen Record On M4 iPad Pro
Take Scrolling Screenshots On M4 iPad Pro
First and foremost, navigate to the content you wish to capture. This could be a lengthy webpage, an email, or a document in an app like Safari, Pages, or Notes. Allow the content to load fully to ensure everything you want to capture is displayed.
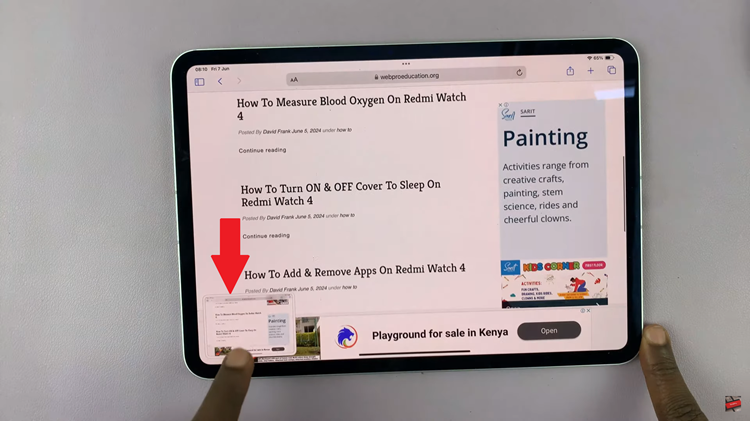
Now, you need to capture a standard screenshot, which will serve as the basis for your scrolling screenshot. To do this, simultaneously press the power button and the volume down button. A thumbnail of the screenshot will appear in the lower-left corner of your screen.

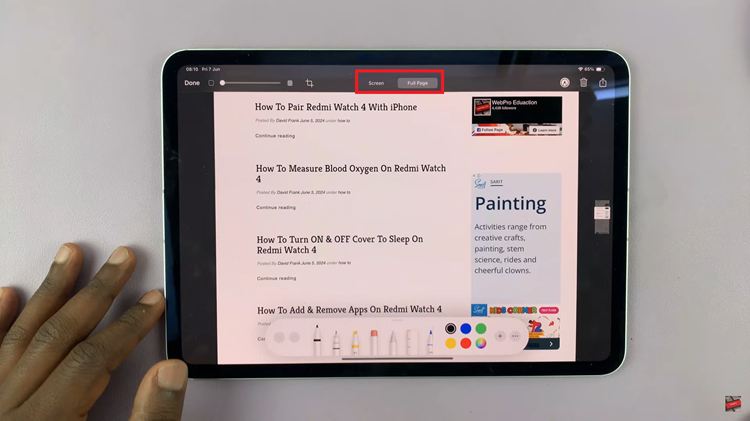
While the thumbnail is still visible, tap on it to enter the screenshot editing interface. This is where you will be able to turn your standard screenshot into a scrolling one. Once in the editing interface, you’ll see an option labeled “Full Page” at the top of the screen. Tap on “Full Page” to capture the entire content, rather than just the visible part.

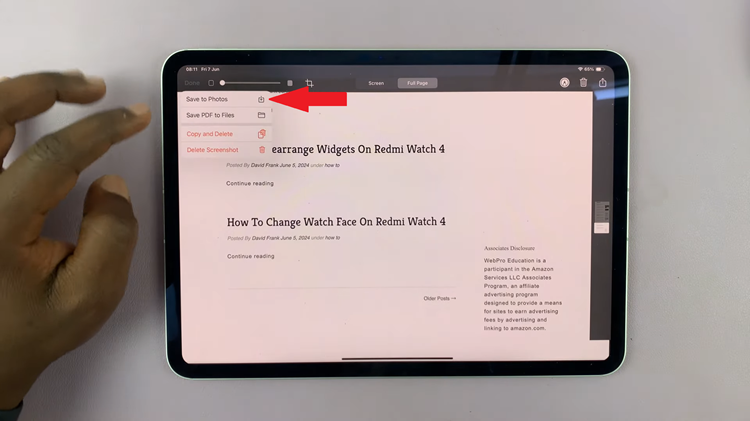
After selecting “Full Page,” you will be able to scroll through the entire captured content to review it. Additionally, you can use the available editing tools to annotate, highlight, or crop parts of the screenshot as needed. Finally, once you are satisfied with your scrolling screenshot, you can save or share it. Tap on “Done” in the top-left corner of the screen, then select “Save to Photos.”

By following these detailed steps, you can easily take a scrolling screenshot on your M4 iPad Pro. This functionality is incredibly useful for saving and sharing long-form content efficiently. Keeping your device updated and familiarizing yourself with the built-in tools will ensure you get the most out of your iPad Pro’s capabilities.

