In an era where staying connected is crucial, especially on the go, understanding how to manage your data roaming settings efficiently can save you from unexpected charges and ensure seamless connectivity. The M4 iPad Pro offers users a plethora of features and functionalities, including the ability to toggle data roaming on and off with ease.
Data roaming allows your device to connect to mobile networks outside of your usual coverage area. While this feature enables you to stay connected while traveling or in areas with limited coverage, it can also result in additional charges from your carrier.
Therefore, knowing how to manage data roaming settings effectively is crucial for controlling costs and optimizing your connectivity experience. In this comprehensive guide, we’ll walk you through the steps to turn on and off data roaming on your M4 iPad Pro.
Watch: How To Enable 5G On M4 iPad Pro
Turn ON & OFF Data Roaming On M4 iPad Pro
To start the process of managing your data roaming settings on the M4 iPad Pro, begin by unlocking your device and navigating to the home screen. Once you’ve reached the home screen, the next step is to locate the Settings app. This app is easily identifiable by its representation—a gear icon prominently displayed on your screen.
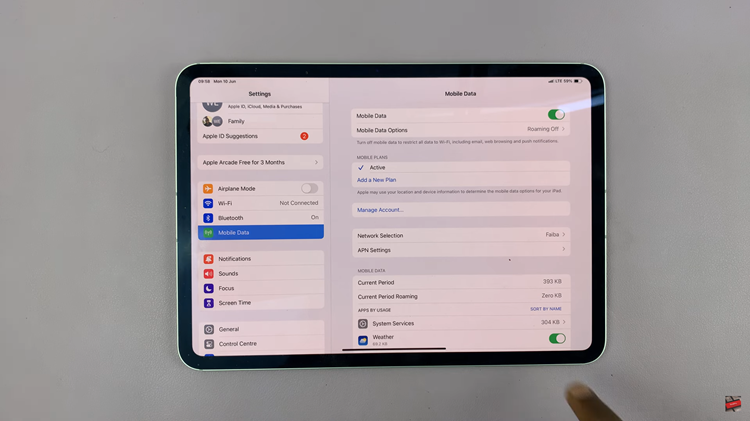
Once you’ve located the Settings app, tap on it to open the Settings menu. Within the Settings menu, you’ll find various options and configurations to customize your iPad’s functionality. Among these options, you’ll need to select “Cellular” or “Mobile Data,” depending on the terminology used by your device. This option is typically located in the left sidebar of the Settings menu.

At this point, you’ll be directed to the Cellular settings page. Here, you’ll find a range of options related to your device’s cellular connectivity. Look for the option labeled “More Data Options” within the Cellular settings and tap on it to proceed further.
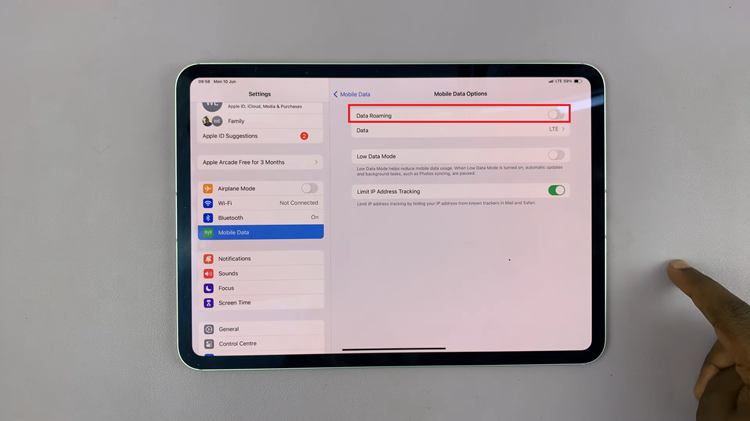
Upon tapping on “More Data Options,” you’ll find the crucial “Data Roaming” option. If you wish to enable data roaming, simply toggle the switch next to the “Data Roaming” option to the ON position. By doing so, you activate data roaming, allowing your device to connect to mobile networks while traveling or outside your usual coverage area.

Alternatively, if you prefer to disable data roaming to avoid potential charges or conserve data usage, you can easily do so by toggling the switch next to the OFF position. Disabling data roaming ensures that your device will only connect to mobile networks within your usual coverage area, minimizing the risk of additional charges or unexpected data usage.

