The iPad is celebrated for its sleek design, powerful capabilities, and intuitive user interface. However, for users with physical disabilities, repetitive strain injuries, or those who simply prefer alternative navigation methods, the standard touch controls can sometimes pose challenges. Recognizing the diverse needs of its users, Apple has integrated a feature called AssistiveTouch into its iOS devices, including the iPad.
AssistiveTouch is an accessibility feature designed to help users perform complex touch gestures and access essential functions with ease. By providing an on-screen menu that can be customized with various commands and shortcuts, AssistiveTouch enables users to interact with their iPad in a more convenient and user-friendly manner.
In this article, we will provide a comprehensive, step-by-step guide on how to enable AssistiveTouch on your iPad.
Watch: How To Turn ON Low Power Mode On iPad
Turn ON Assistive Touch On iPad
To begin, locate and tap the Settings app on your iPad’s home screen. This app is represented by a gear icon, making it easily identifiable among other apps. Once you have opened the Settings app, navigate through the menu to find the necessary options.
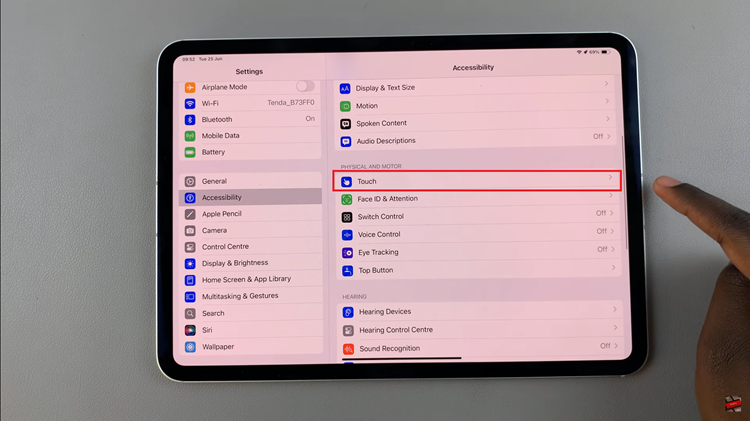
At this point, scroll down and select Accessibility. Then, locate and tap on Touch within the Accessibility menu. This option is typically found under the ‘Physical and Motor’ section, which groups together settings that assist with physical interaction and motor skills. By tapping on Touch, you access specific settings related to touch interactions on your iPad.

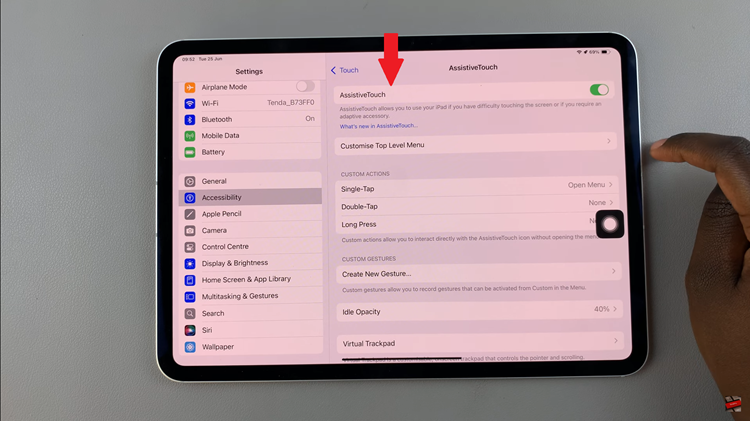
Conversely, tap on AssistiveTouch. This will bring you to the screen where you can enable this feature. To activate AssistiveTouch, toggle the switch next to AssistiveTouch to the ON position. Upon doing so, a new button will appear on your screen, signifying that AssistiveTouch is now active.

Finally, after enabling AssistiveTouch, you have the option to customize its menu according to your needs. This allows you to tailor the AssistiveTouch menu to include functions and shortcuts that are most useful to you, enhancing your overall experience and accessibility with your iPad.
Follow the steps above to enable and customize this feature, making your iPad experience more accessible and convenient.
Read: How To Change Nintendo Switch Language Back To English

