The Notification Center on your iPad serves as a hub for keeping you informed about important updates, messages, and alerts from your apps. It aggregates notifications in one accessible place, ensuring you’re always up-to-date without having to constantly switch between apps.
Whether you prefer to stay connected throughout the day to stay on top of emails, messages, and news updates, managing the Notification Center settings empowers you to customize your iPad’s notification behavior precisely to your preferences.
This flexibility not only enhances productivity by reducing distractions but also ensures that critical alerts are always prioritized and easily accessible when needed. Here’s a guide on how to enable and disable the Notification Center, ensuring you have full control over your iPad’s notification experience.
Watch: How To Install CapCut Video Editor On iPad
Enable & Disable Notification Center On iPad
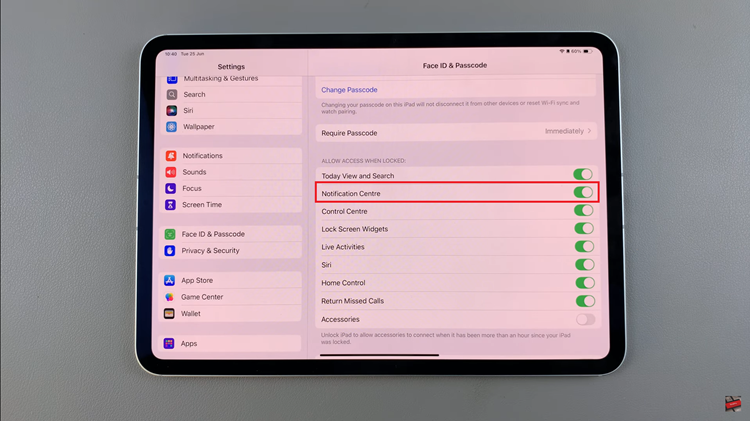
To begin customizing your Notification Center on iPad, start by unlocking your device and accessing the home screen. Then, locate and tap on the “Settings” icon, typically represented by a gear symbol. Once you’re in the Settings menu, scroll down until you find the “Face ID & Passcode” option and tap on it to proceed.
Following this, you’ll need to authenticate with your passcode or Face ID if prompted. Scroll further down the page until you reach the “Allow Access When Locked” section. Here, locate the “Notification Center” option.

To enable Notification Center access from the lock screen, toggle the switch to the ON position. Conversely, if you wish to disable access to the Notification Center, toggle the switch to the OFF position. After making your selection, exit the Settings page by pressing the Home button or swiping up from the bottom of the screen (depending on your iPad model).
By customizing these settings, you can tailor the Notification Center to better suit your needs, whether you prefer staying informed throughout the day or minimizing interruptions during focused work sessions.

