Excel sheets can be password protected to prevent unauthorized access. But what happens when you forget the password to your own Excel spreadsheet?
There are many third party tools you can use to circumvent the password but here at WebPro, we don’t use third party tools; well . . . . unless we have to! For this one, we don’t need one and here’s why!
The first thing you need to do is to make a copy of the spreadsheet in case the copy you’re working on gets corrupted. Now with that out of the way, it’s time to get started with this ‘hack’.
Change the Excel spreadsheets file extension from .xlsx to .zip Then open the file in the zip program that you have installed on your computer. You can use either Winzip or WinRAR. They are both free!
With the file open in your .zip program, open the ‘xl‘ folder and then go to the ‘worksheets‘ folder. You should see your worksheet in form of an XML document. If it’s a workbook, you’ll see all the sheets inside with their names.
Copy that sheet and paste it in a different location (like on your desktop). Then open it using notepad. You should see a messy document with characters you can’t understand…..it’s important not to panic!
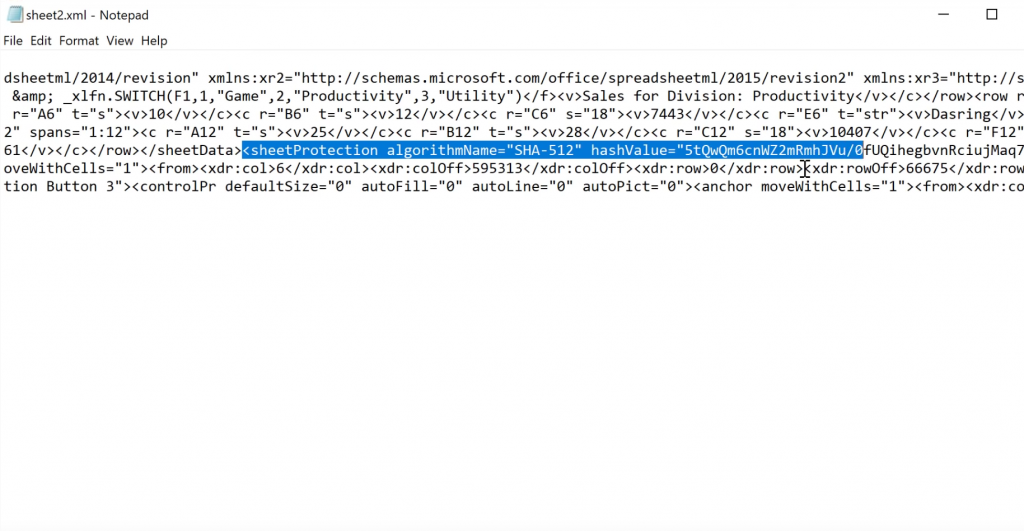
Open the finder in Notepad by pressing Ctrl + F on your keyboard and search for ‘protect’. You should see something like the image shown below.

Make sure you select everything between the angle brackets within which the words ‘sheetProtection………..’ appear. Be careful not to select anything else. The Delete. You’ll have deleted the password to that Excel sheet.
Click Save and paste that file back to the ‘worksheets folder you got it from. This will replace the sheet with the password to the new one without the password. Now close that .zip software window and change the file extension back to .xlsx
That’s it. Your Excel sheet is now password free! If you want to, you ca now add another password to the sheet and hopefully, time it’s a password you will not forget.
Read: More Excel Tutorials

