Ubuntu 23.04, the latest iteration of the popular Linux-based operating system, brings a host of new features and improvements to enhance your computing experience. Whether you’re a developer, a student, or a casual user, installing Ubuntu 23.04 on your computer opens up a world of possibilities.
Creating a bootable USB drive is a simple and efficient way to install or try out Ubuntu 23.04 on your computer.
In this article, we will walk you through how to create Ubuntu 23.04 bootable USB drive.
Also Watch: How To Turn Off Touch Accommodations On iPhone
How To Create Ubuntu 23.04 Bootable USB
Begin by downloading the official Ubuntu 23.04 ISO file from the Ubuntu website. Next, insert your USB flash drive into your computer. Make sure it has a capacity of at least 4GB.
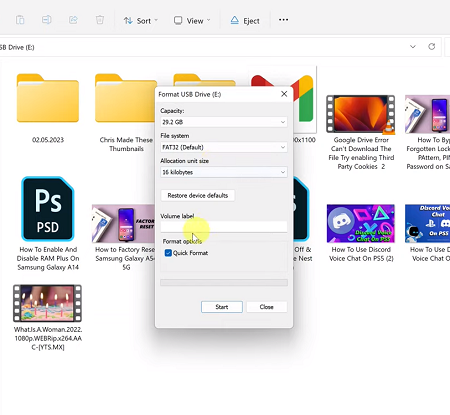
Now, open the Disk Management tool on Windows, Disk Utility on macOS, or GParted on Linux, and format the USB drive to the FAT32 file system.

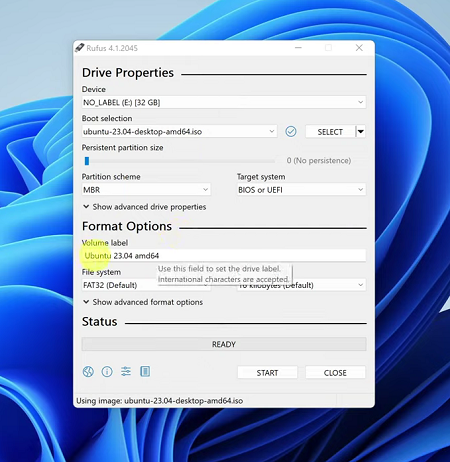
Next, download the utility tool (Rufus) to create the bootable USB. Once installed, Launch the program and select your USB drive from the “Device” dropdown menu. Click on the “Select” button next to the Boot selection and choose the Ubuntu 23.04 ISO file you downloaded.

At this point, double-check that the partition scheme is set correctly (MBR for BIOS or GPT for UEFI) and initiate the process of creating the bootable USB by clicking the “Start” button. Wait for the process to complete.
Finally, it’s time to verify the integrity of the bootable USB. Go to the USB drive window and check if all files were successfully integrated without any errors.
And that’s how to go about it. Let us know in the comment section below if you have any questions or suggestions. If you found the article helpful, consider sharing it with your friends.

