In today’s digital age, maintaining your privacy online is more crucial than ever. Apple’s Face ID provides a convenient and secure way to unlock your iPad and access various apps.
However, when it comes to private browsing, you might prefer an additional layer of security. Disabling Face ID for private browsing on your iPad can help ensure that your browsing habits remain confidential. Here’s a step-by-step guide on how to achieve this.
Face ID is designed for convenience and security, but there are scenarios where you might want to prevent automatic access to your private browsing sessions. Disabling Face ID for private browsing can be beneficial if:
You share your device with others.
You want to ensure that only you can access your private browsing tabs.
You’re concerned about unauthorized access to your browsing history.
Watch: How To Hide Home Screen On M4 iPad Pro
Disable Face ID For Private Browsing On iPad
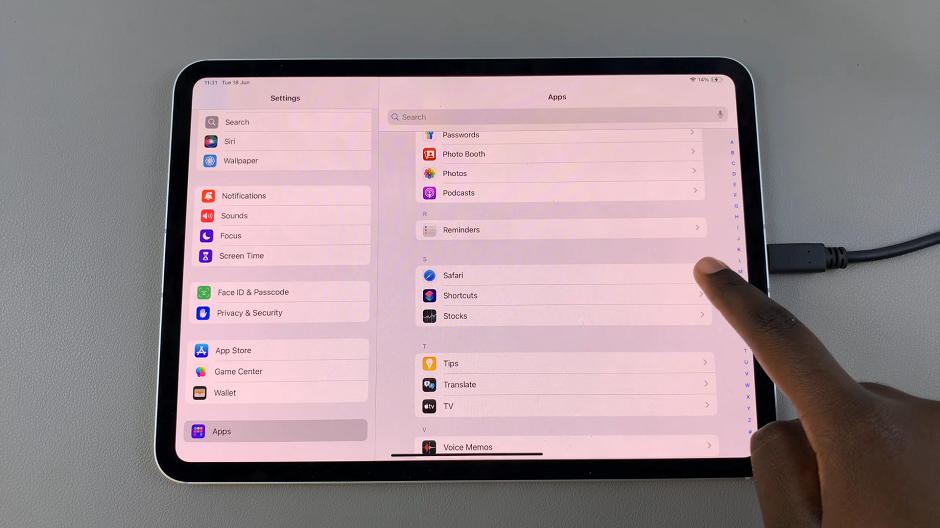
First, unlock your iPad and navigate to the Settings app, which is represented by a gear icon.
In the Settings menu, scroll through the left-hand side panel and tap on Apps. This section contains various apps. Find Safari and tap on it to open its settings.
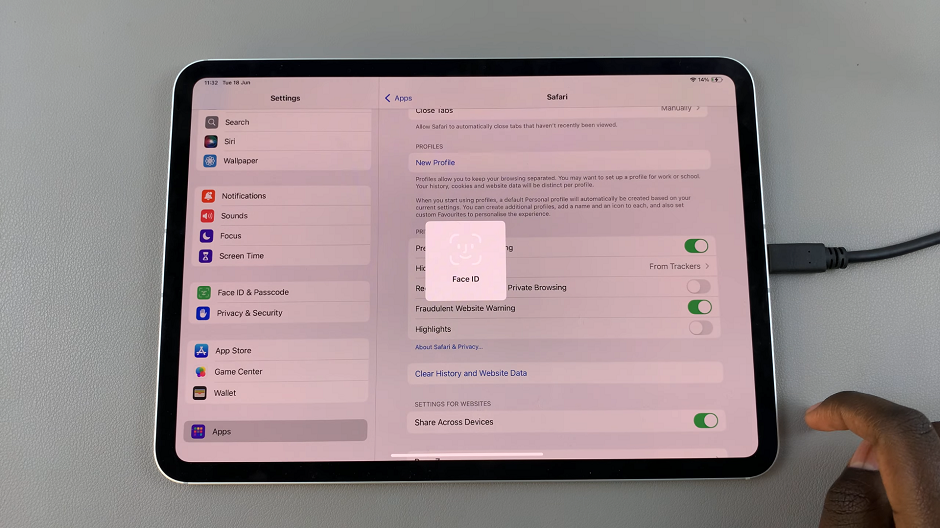
Once you’re in the Safari settings, look for the Require Face ID to Unlock Private Browsing option, under the Privacy & Security section. It should have a toggle button next to it.
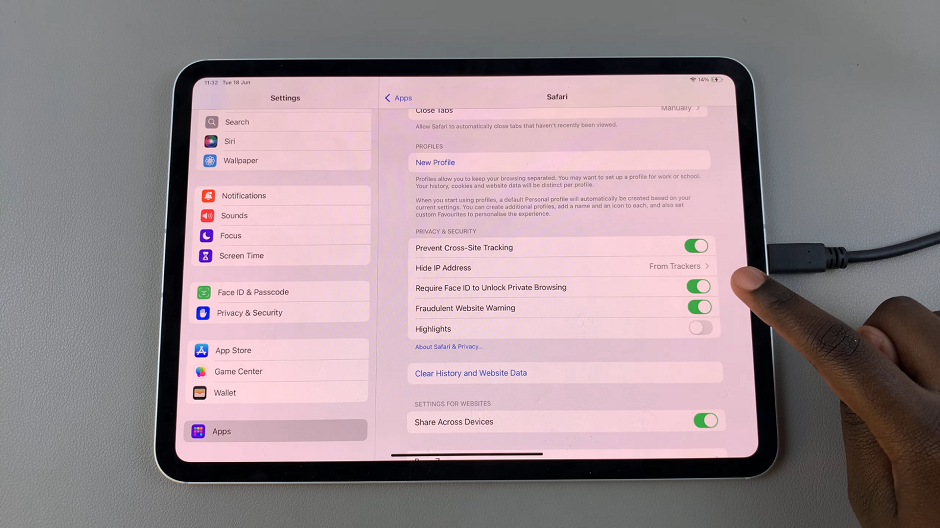
Toggle off the switch next to Require Face ID to Unlock Private Browsing to disable Face ID specifically for Safari’s private browsing mode. Your Face ID will be scanned and this feature will be disabled.
This will prevent Face ID from automatically filling in saved passwords and information while browsing privately.
Once you have disabled Face ID for Safari, you can exit the Settings app and proceed to use Safari for private browsing without Face ID unlocking it. Open Safari and tap on the tabs icon at the bottom right corner of the screen. Then, tap on Private to enter private browsing mode.
This ensures your browsing history is not saved, and cookies are not stored.
Note: It’s important to remember that disabling Face ID for Safari’s private browsing mode will only prevent Face ID from unlocking your private browsing on Safari. It does not affect other security features such as Touch ID or your device passcode.
Additional Privacy Settings
While in the Safari settings, consider enabling other privacy features:
Prevent Cross-Site Tracking: Blocks websites from tracking your browsing activity.
Block All Cookies: Prevents websites from storing cookies on your device.
Ask Websites Not to Track Me: Sends a request to websites to not track your browsing.
Tips for Enhanced Privacy
Here are some additional tips to ensure your online privacy while using your iPad:
Use a VPN: A Virtual Private Network can add an extra layer of security by masking your IP address and encrypting your internet connection.
Regularly Clear Browsing Data: Go to Safari settings and clear your history and website data periodically.
Install Privacy-Focused Browsers: Consider using browsers that prioritize privacy, such as DuckDuckGo or Firefox Focus.
Disabling Face ID for private browsing on your iPad is a straightforward process that can significantly enhance your online privacy. By following the steps outlined above, you can ensure that your private browsing sessions remain confidential and secure. Remember, maintaining your privacy online is an ongoing effort, and staying informed about the latest privacy features and practices is key to safeguarding your personal information.