Empower your Samsung Galaxy S24 or S24 Ultra experience by mastering the art of screen-saver control. Your smartphone’s display is more than just a window into the digital world; it’s a canvas for personalization and protection.
Knowing how to enable or disable the screen saver feature not only safeguards your device against screen burn-in but also allows you to inject your unique style into every interaction. Whether you’re keen on preserving your screen’s longevity or eager to add a touch of flair to your device, you’ll emerge equipped with the knowledge to tailor your smartphone experience to perfection.
In this guide, we’ll walk you through the steps to take full control of your Samsung Galaxy S24 or S24 Ultra’s screen saver settings. Let’s dive in and unlock the full potential of your device’s display capabilities.
Watch: How To Connect Wireless Xbox Controller To Samsung Galaxy S24
To Enable & Disable Screen Saver On Samsung Galaxy S24
Begin by unlocking your Samsung Galaxy S24, S24+, or S24 Ultra. Utilize your preferred method, such as fingerprint recognition or facial unlock. Then, open the “Settings” app on your device. Locate it either on your home screen or in the app drawer.
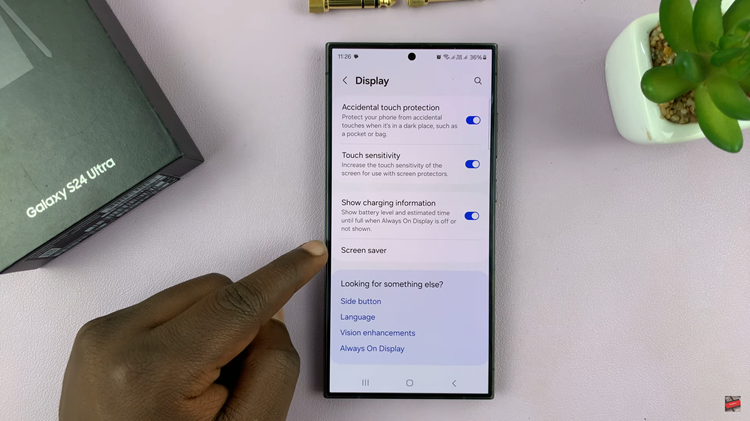
Within the Settings menu, scroll down to find and select the “Display” option. At this point, scroll towards the bottom and select the “Screen Saver” option.

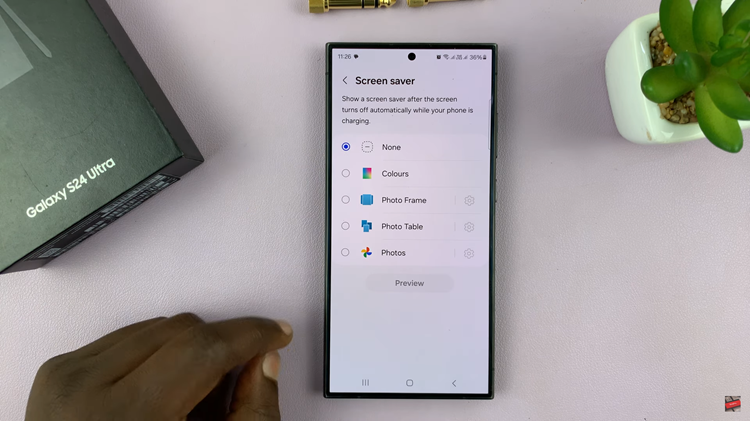
Following this, you’ll see a couple of options that you can choose from; Colors, Photo Frame, Photo Table, Photos, & None. To turn on the screen saver, choose the options to prefer and follow any on-screen instructions that might appear. Subsequently, if you’d like to turn off screen saver, tap on “None.”

In conclusion, customizing your Samsung Galaxy S24 or S24 Ultra to your liking is part of the joy of owning a smartphone, and enabling or disabling the screen saver is just one of the many ways you can personalize your device.

