Picture in Picture (PIP) mode is a multitasking feature that allows you to watch videos in a small window while using other apps on your iPad. This innovative feature enhances the user experience by providing a way to stay engaged with video content without having to pause or stop other tasks.
This feature is incredibly useful for staying productive while keeping an eye on your favorite content. For instance, you can watch a tutorial while taking notes, or keep up with a video call while checking your email. The ability to multitask effectively without interrupting your media consumption makes PIP mode a valuable tool for both personal and professional use.
Here’s a step-by-step guide on how to enable and use Picture in Picture mode on your M4 iPad Pro. By following these instructions, you will be able to activate this feature and integrate it into your daily routine.
Watch: How To Turn ON Location Services On M4 iPad Pro
Enable Picture In Picture Mode On M4 iPad Pro
To begin, unlock your iPad Pro and access the home screen. Then, locate the Settings app, which is denoted by a cogwheel icon. Tap on it to proceed. This will open up the Settings menu, where you can adjust various features and settings on your device.
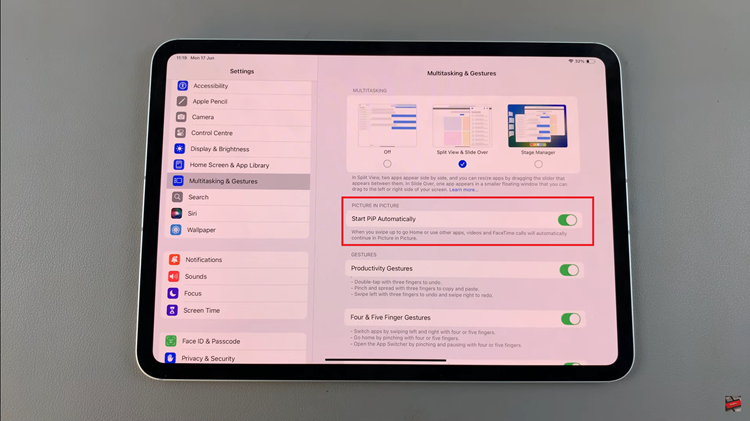
Following this, scroll down through the Settings menu until you find the “Multitasking & Gestures” option. Tap on it to open the multitasking settings. Within this section, you will find various options related to multitasking on your iPad. Look for the “Start PIP Automatically” option, which is essential for enabling Picture in Picture mode.

At this point, you’ll notice a toggle switch next to the “Start PIP Automatically” option. To enable this feature, simply toggle the switch to the ON position. Once done, exit the settings. The changes you have made will be saved automatically, and your iPad will now support Picture in Picture mode for compatible apps.
In conclusion, Picture in Picture mode on the M4 iPad is a powerful tool for multitasking, allowing you to keep videos playing while you work on other tasks. By following these steps, you can easily enable and make the most of this feature.

