Error 80072ee2 is usually encountered when you;re trying to update your Windows operating system. When errors like this occur, you’re not able to install updates to your computer and this can be very frustrating.
There are a couple of fixes you can administer to get id of this error message and successfully update your Windows operating system. Since the error does not go to length to explain exactly what the issue is, we will use the elimination method to determine and fix the problem.
How To Fix 80072ee2 Error In Windows Update
1) Check Your Date and Time
Before you even start inspecting the 80072ee2 Error In Windows Update and where it’s coming from, the problem might be right before your eyes. If you have your date and time all jumbled up and wrong, then this might confuse your PC’s update manager and cause this error. So first, ensure you have the date and time correct before attempting to update.
2) Run The Windows Update Troubleshooter
The windows operating system has a built in troubleshooter that you can invoke in case you’re having any kind of problem with windows. The troubleshooter attempts to diagnose the problem and offer you possible solutions to the problem.
As a first resort, run the Windows update trouble shooter to see if you can get anywhere. The Windows troubleshooter is in the control panel. Simply open the control panel and type ‘Troubleshooter’. Open it and under System and Security, click Fix problems with Windows Update.
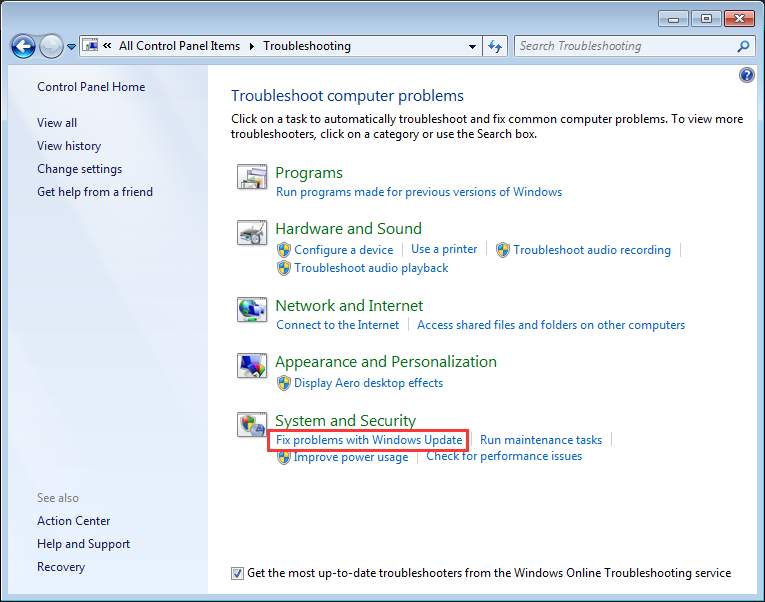
Follow the on screen instructions and let the troubleshooter attempt to find the problem with your Windows update. I’ll be honest with you, you’re more likely to find a needle in a hay stack; unless you’re very lucky. So I’ll quickly move to the next fix.
3) Edit the Registry
The 80072ee2 error In Windows Update could be caused by corrupted files in the registry. It’s hard to tell if that’s really the case before getting in there and changing some things then trying to run the Windows update again. For that reason and other obvious reasons, it’s important to back up your registry before starting this process.
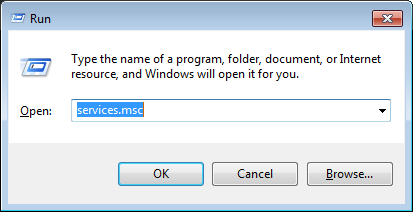
Press Win+R to open the Run dialogue box. Then Type services.msc in the run box and click OK button.
Find Windows Update service. Right-click on it and select Stop. Now that you’ve stopped the Windows update service, go ahead and clear the contents of C:\Windows\SoftwareDistribution Then Start the Windows service again.
Now it’s safe to open and edit the registry. Open the Run dialogue box again and type regedit and click OK.
In the Registry Editor, navigate to HKEY_LOCAL_MACHINE\SOFTWARE\Policies\Microsoft\Windows\WindowsUpdate.
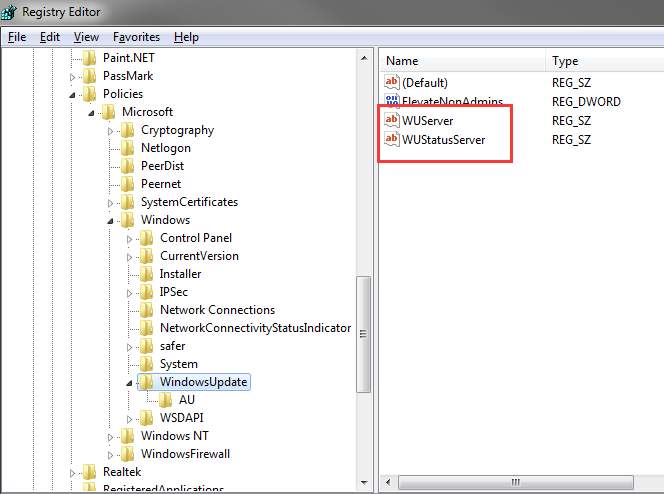
With that selected, you’ll see WUServer and WUStatusServer on the right hand side pane. Delete both files by right clicking and selecting ‘Delete’.
Check one last time to confirm Windows update service is ‘Started’ then attempt to update your computer again. By this time you should have your problem solved.
Also Read: How To Play DVDs and Blue Rays In Windows 10
