In this interconnected world, our smartphones have become indispensable tools that not only keep us connected but also serve as personal assistants. One critical aspect of these devices is ensuring that the time zone settings are accurate, especially when traveling or in different geographical locations.
Understanding how to change the time zone on an Android device is essential for various scenarios, including international travel, remote work across time zones, or simply maintaining accurate timekeeping.
Luckily, Android offers users a straightforward method to adjust time zone settings, allowing them to align their device’s time with their current location. Here’s a step-by-step guide on how to change the time zone on your Android device.
Watch: How To Check Battery Health On Android
To Change Time Zone On Android
Firstly, open the “Settings” app on your Android device. This app icon usually looks like a gear or cogwheel and can be found on the home screen or in the app drawer.
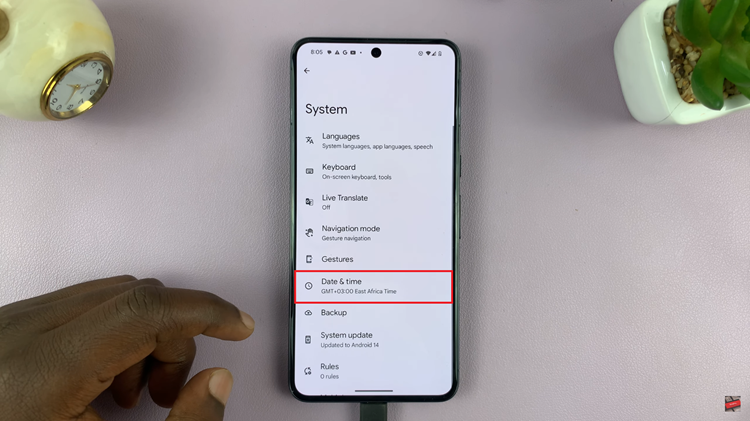
Then, find the ‘System‘ or ‘General Management‘ option in the Settings menu. Tap on it to proceed. At this point, look for the ‘Date & Time‘ option and tap on it. You’ll find options to set the time, date, and time zone.

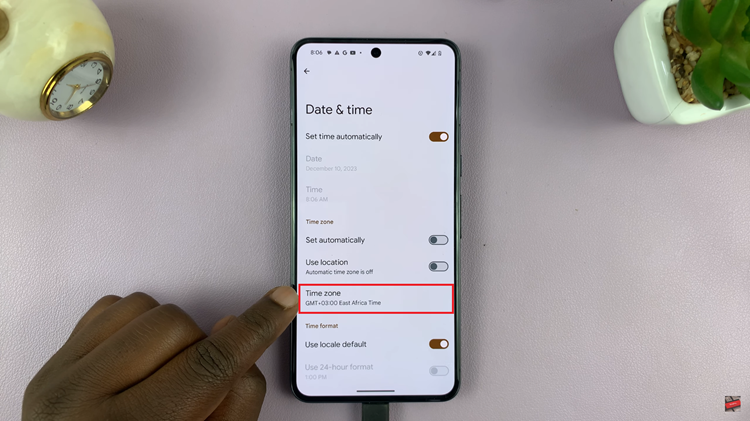
At this point, if the automatic date and time setting is enabled, toggle it off. This allows manual adjustment of the time zone. Afterward, tap on ‘Time Zone‘ and you’ll see a list of time zones to choose from. Scroll through the list and choose the correct time zone for your location or the one you wish to set.

Once you’ve selected the appropriate time zone, exit the settings. Your device should now reflect the updated time zone.
In conclusion, adjusting the time zone on an Android device is a simple process, offering flexibility for users to manage their time settings according to their location or preferences. By following these steps, you can easily adjust the time zone on your Android device, ensuring that it accurately reflects the local time wherever you go.

