In the realm of digital design, mastering the art of rounding corners adds a subtle yet impactful dimension to your creations. In this comprehensive guide, we’ll delve into the intricacies of rounding corners on Canva, the versatile online design platform. Whether you’re a seasoned graphic designer or a novice exploring the world of digital creativity, learning how to round corners on Canva opens up a world of possibilities for enhancing your visual storytelling. Join us as we navigate through step-by-step instructions and insider tips, facilitating a seamless transition into empowering you with the skills to elevate your designs to new heights of professionalism and sophistication.
With Canva’s intuitive interface and extensive range of design tools, incorporating rounded corners into your projects has never been easier. From sleek business presentations to eye-catching social media graphics, the versatility of rounded corners transcends various design applications, adding a touch of elegance and modernity. Throughout this article, we’ll explore different techniques and creative uses for rounded corners, empowering you to unleash your creativity and make your designs truly stand out in a crowded digital landscape. Let’s dive in and discover how to round corners on Canva to unlock your full design potential.
Watch:How To Make a Dotted Line In Canva
Rounding Corners In Photos On Canva
🔹 Heres’s The Step-by-Step Guide:
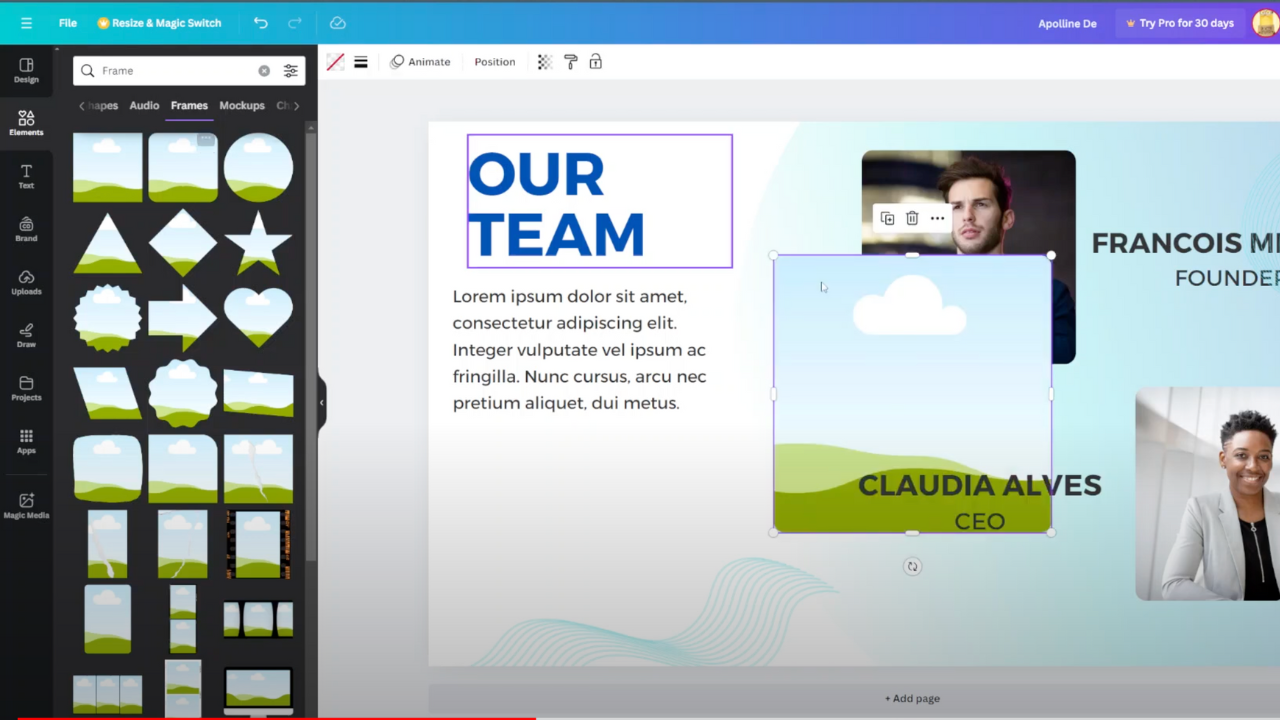
Step 1: Begin by enhancing your design with a frame. Navigate to the “Elements” section within Canva’s user-friendly interface and locate the search bar. Type in “frame” to access a wide array of frame options to choose from.

Step 2: Select a frame that features rounded edges to complement the aesthetic you’re aiming for. Once you’ve found the perfect frame, simply click on it to add it to your project canvas. Canva allows you the flexibility to scale the frame to your desired dimensions, ensuring it fits seamlessly within your design layout.

Step 3: Now, it’s time to personalize your frame by adding a captivating photo. Head over to the “Photos” tab within Canva and search for the image that best aligns with your design vision. Once you’ve found the ideal photo, click on it to add it onto your empty frame.

Step 4: Fine-tune the placement and appearance of your photo within the frame by double-clicking on it. This action allows you to adjust the size, position, and orientation of the photo to achieve the perfect composition.

Once you’re satisfied with your design, click on the “Done” button to save and apply the changes. Your frame-enhanced photo is now ready to be shared, whether it’s for social media posts, presentations, or personal projects.
Read:How To Make A Dotted Line On Canva
🔹 Tips and Tricks:
Experiment with different corner radius values to achieve the desired effect. Consider the overall aesthetic of your design and how rounded corners can enhance its visual appeal. Don’t be afraid to play around with other design elements in Canva to create unique compositions.
🔹 About Canva:
Canva is a user-friendly graphic design platform that empowers users to create stunning visuals for various purposes, from social media graphics to presentations and more. With its intuitive interface and extensive library of design elements, Canva makes it easy for anyone to unleash their creativity and bring their ideas to life.

