Welcome to our comprehensive tutorial on how to set a timer in Canva!
Whether you’re creating a countdown for an event, a timer for a presentation, or adding a sense of urgency to your design, Canva’s user-friendly tools make it easy to incorporate timers into your projects. In this video, we’ll guide you step-by-step through the process of adding and customizing timers in Canva, ensuring your designs are both functional and visually appealing. From selecting the right timer template to adjusting its settings, we’ll provide detailed instructions to help you seamlessly integrate this feature into your work. Additionally, we’ll explore various ways to personalize your timer, making it a perfect fit for your specific design needs.
Furthermore, we understand that not everyone has prior design experience. Therefore, our tutorial is tailored to be accessible for beginners while also offering valuable tips for more experienced users. We’ll cover everything from the initial setup to advanced customization options, such as selecting complementary music and adjusting the timer’s visual elements. By the end of this tutorial, you’ll be equipped with the knowledge to create professional-looking timers that enhance your presentations and projects. So, if you’re ready to enhance your Canva skills and add a dynamic element to your designs, stay tuned and let’s dive into the world of timers in Canva!
Watch:How To Add Bleed In Canva
Setting A Timer In Canva
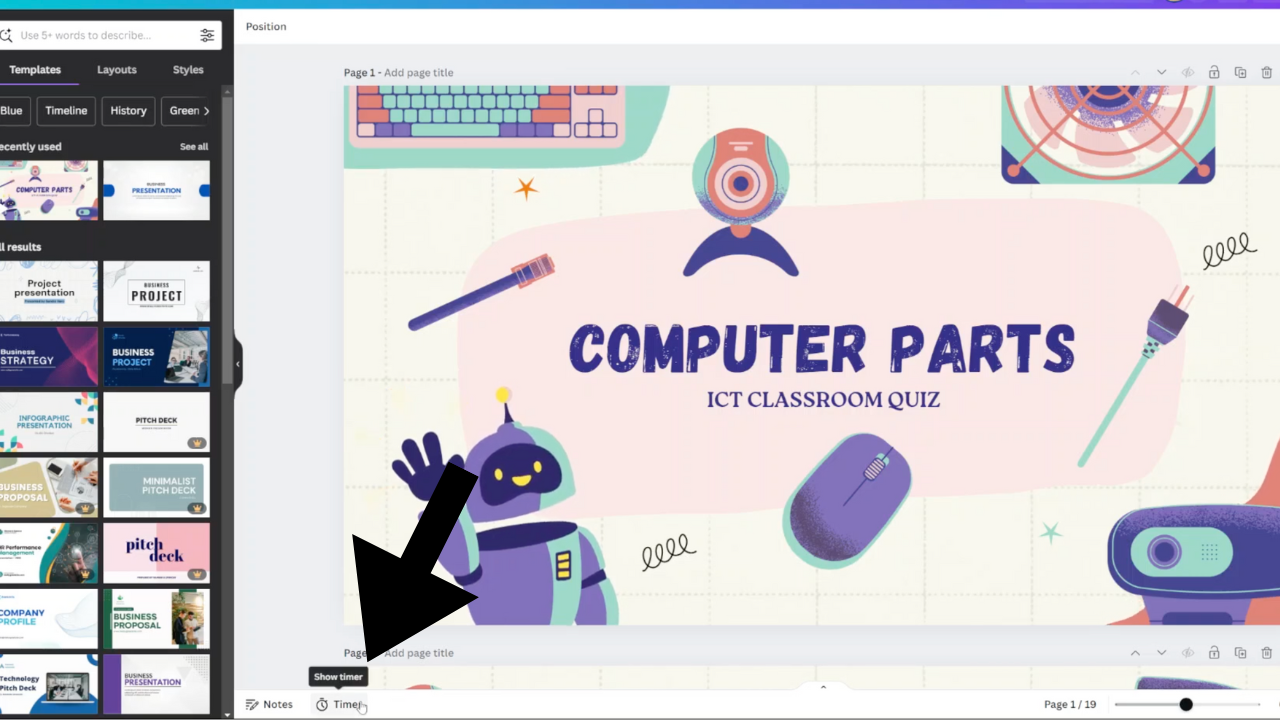
Here’s how; This feature is available on the presentation design template Step 1:Click on the option timer at the bottom and edit it to your liking. Step 2.You can also select the music you want to go with the timer.
Step 1: First, start by selecting the presentation design template in Canva. Once you have your design open, navigate to the bottom of the screen where you’ll find the “Timer” option. Click on this option to access the timer settings. Here, you can edit the timer to suit your specific needs. You can adjust the duration by setting the minutes and seconds, ensuring it fits perfectly with your presentation’s requirements. Additionally, you can customize the appearance of the timer to match your design by changing the font, color, and size. This will help ensure that the timer not only functions well but also looks great within your presentation.

Step 2: Next, to enhance your timer even further, you can select the music that will play along with it. This feature is particularly useful for creating a more engaging and dynamic presentation. To add music, click on the “Music” option available in the timer settings. Browse through Canva’s library of music tracks or upload your own audio file to find the perfect accompaniment for your timer. Once you’ve selected a track, you can adjust the volume and set the timing to sync with your timer. This way, your audience will have an auditory cue along with the visual countdown, making your presentation more immersive and impactful.

Read:How To Add Bleed On Canva
Finally;
As we wrap up this tutorial, it’s essential to reflect on the newfound skills you’ve acquired. By mastering the art of setting timers in Canva presentations, you’ve unlocked a powerful tool for captivating your audience and delivering impactful messages. With each step we’ve explored, you’ve gained valuable insights into customizing timers to suit your specific needs and elevating the visual appeal of your designs.
Now equipped with the ability to seamlessly integrate timers into your presentations, you’re ready to embark on a journey of creativity and innovation. Whether you’re a seasoned presenter looking to add an extra layer of professionalism to your slides or a newcomer eager to make a memorable impression, Canva’s timer feature offers endless possibilities for enhancing your content.

