Unlock the full potential of your Samsung Galaxy S24 or S24 Ultra by mastering the art of managing automatic updates. In today’s fast-paced digital world, staying abreast of the latest software updates is paramount to ensure your device operates efficiently, remains secure, and offers cutting-edge features.
With the ability to control automatic updates, you wield the power to tailor your smartphone experience to your preferences. Whether you’re eager to embrace the convenience of automatic updates or prefer a more hands-on approach, learning how to toggle this feature on or off is essential.
This guide empowers you to take charge of your Samsung Galaxy S24 or S24 Ultra, enabling you to make informed decisions about how your device receives and installs updates. So, let’s dive into the steps of how to turn on and off automatic updates on your device, allowing you to optimize its performance and functionality according to your desires.
Watch: How To Add ESIM To Samsung Galaxy S24
To Turn ON & OFF Automatic Updates On Samsung Galaxy S24
Begin by unlocking your Samsung Galaxy S24, S24+, or S24 Ultra. Utilize your preferred method, such as fingerprint recognition or facial unlock. Then, open the “Settings” app on your device. Locate it either on your home screen or in the app drawer.
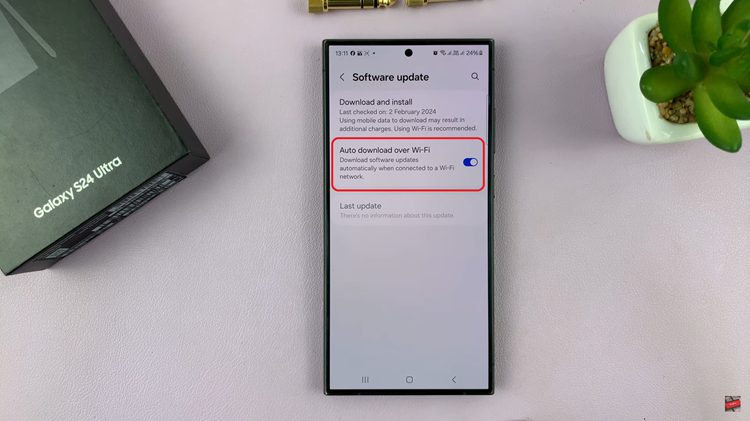
Within the Settings menu, scroll down to find and select the “Software Update” option. Following this, find the “Auto Download On WiFi” option, then toggle ON or OFF to enable and disable automatic updates on your Samsung S24 device.

By following these steps, you can easily manage automatic updates on your Samsung Galaxy S24 or S24 Ultra according to your preferences. Whether you opt for automatic updates for convenience or prefer manual control for more oversight, keeping your device updated ensures you enjoy the latest features and security enhancements.

