So, Google Chrome, like many other modern web browsers, has something quite interesting called Hardware Acceleration. It is designed to make graphics-intensive activities run much smoother, such as video playback, 3D rendering, or even web gaming. Rather than relying directly on the CPU for complex processes, hardware acceleration offloads some work onto the GPU television sets or monitors, which are much more capable of processing the heap of graphics.
When you turn on hardware acceleration, you might notice that browsing feels smoother, pages load quicker, and video and gaming performance boosts. But hey, even though this feature can really improve your browsing, it’s not all sunshine and rainbows.
On some systems, especially those with older or incompatible graphics drivers, hardware acceleration can lead to problems like screen flickering, sluggish performance, or even browser crashes. In this guide, we will show you how to turn on and off graphic (hardware) acceleration in Google Chrome.
Watch: How To Turn ON Safe Search On Google Chrome
Turn ON & OFF Graphic (Hardware) Acceleration In Google Chrome
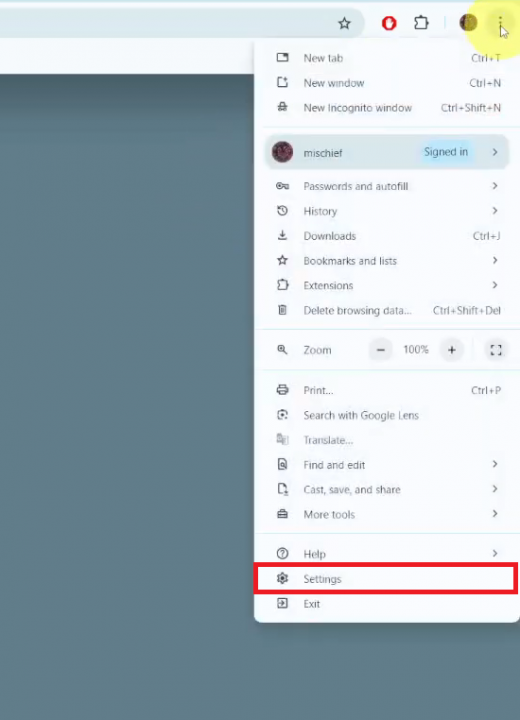
Begin by opening the Google Chrome browser. From here, tap on the ellipsis tool at the top right corner of the screen. From the menu that appears, find and click on “Settings.”

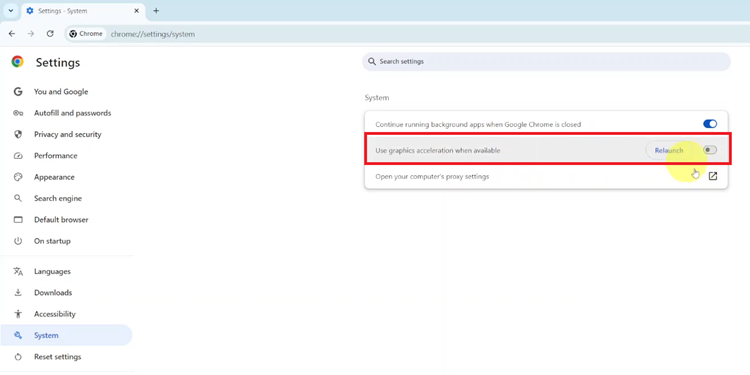
Following this, click on the “System” option then find the “Use graphics acceleration while available” option. You’ll notice a toggle switch next to it. Toggle ON the switch to enable this feature. Then, you can click on “Relaunch,” and the changes will be applied. Subsequently, toggle OFF the switch to disable this feature.

In conclusion, hardware acceleration control in Google Chrome can make or break your browsing experience, speeding things up or correcting problems. Therefore, using the steps described here, you should understand how to turn hardware acceleration on or off depending on what the operating system demands of it.

